Showing posts with label SpringBoot. Show all posts

Spring Boot Interview Questions Set 2

Q1. Can we create a non-web application in Spring Boot?

Yes, we can create a non-web application by removing the web dependencies from the classpath along with changing the way Spring Boot creates the application context.

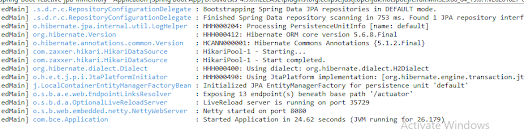
Q2. Is it possible to change the port of the embedded Tomcat server in Spring Boot?

Yes, it is possible. By using the server.port in the application.properties. server.port=YOUR PORT

Q3. What is the default port of tomcat in spring boot?

The default port of the tomcat server-id is 8080. It can be changed by adding sever.port properties in the application.property file.

server.port=YOUR PORT

Q4. Can we override or replace the Embedded tomcat server in Spring Boot?

Yes, we can replace the Embedded Tomcat server with any server by using the Starter dependency in the pom.xml file.

Q5. Can we disable the default web server in the Spring boot application?

Yes, we can use application.properties to configure the web application type i.e spring.main.web-application-type=none.

Q6. How to disable a specific auto-configuration class?

You can use exclude attribute of @EnableAutoConfiguration if you want auto-configuration not to apply to any specific class.

@EnableAutoConfiguration(exclude={className})

Q7. Explain @RestController annotation in Sprint boot?

It is a combination of @Controller and @ResponseBody, used for creating a restful controller. It converts the response to JSON or XML. It ensures that data returned by each method will be written straight into the response body instead of returning a template.

Q8. What is the difference between @RestController and @Controller in Spring Boot?

@Controller Map of the model object to view or template and make it human-readable.

@RestController simply returns the object and object data is directly written in HTTP response as JSON or XML.

Q9. What is the difference between RequestMapping and GetMapping

RequestMapping can be used with GET, POST, PUT, and many other request methods using the method attribute on the annotation. Whereas getMapping is only an extension of RequestMapping which helps you to improve on clarity on requests.

Q10. What is Spring Actuator? What are its advantages?

An actuator is an additional feature of Spring that helps you to monitor and manage your application when you push it to production. These actuators include auditing, health, CPU usage, HTTP hits, and metric gathering, and many more that are automatically applied to your application.

Q11. How to enable Actuator in the Spring boot application?

To enable the spring actuator feature, we need to add the dependency of “spring-boot-starter-actuator” in pom.xml.

<dependency>
    <groupId> org.springframework.boot</groupId>
    <artifactId> spring-boot-starter-actuator </artifactId>
</dependency>


Q12. What are the actuator-provided endpoints used for monitoring the Spring boot application?

Actuators provide below pre-defined endpoints to monitor our application -

Health

Info

Beans

Mappings

Configprops

Httptrace

Heapdump

Threaddump

Shutdown

Q13. What is a Swagger in Spring Boot?

Swagger is used for clearly detailing and documenting RESTful APIs in a machine-readable and human-readable format, which is easily comprehensible for testers and developers, as well as individuals having little knowledge of source code.

Q14. What are Profiles in Spring Boot?

Profiles in the Spring framework enable users to map components and beans to specific profiles, such as the Development (dev) profile, Production (prod) profile, or the Test profile. In Spring Boot, the annotation @Profile is used to map components and beans to a certain profile. Developers can also set up profiles using the SpringApplication, for instance, SpringApplication.setAdditionalProfiles("dev"). In another way, While developing the application we deal with multiple environments such as dev, QA, and Prod, and each environment requires a different configuration. To make this easy and clean, Spring has the provision Profiles to keep the separate configuration of environments.

Q15. How to enable debugging log in the spring boot application?

Debugging logs can be enabled in three ways -

We can start the application with the --debug switch.

We can set the logging.level.root=debug property in application.property file.

We can set the logging level of the root logger to debug in the supplied logging configuration file.

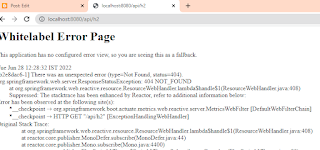
Q16. How to resolve the Whitelabel error page in the spring boot application?

This is quite a common error in the spring boot application which says 404 (page not found).

We can mostly resolve this in 3 ways:

Custom Error Controller– where you will be implementing the ErrorController interface which is provided by SpringFramework and then overriding its getErrorPath() so that you can return a custom path whenever such type of error has occurred.

By Displaying Custom error page– All you have to do is create an error.html page and place it into the src/main/resources/templates path. The BasicErrorController of spring boot will automatically pick this file by default.

By disabling the Whitelabel error page– is the easiest way where all you need to do is server.error.whitelabel.enabled property to false in the application.properties file to disable the whitelabel error page.

Q17. What annotations are used to create an Interceptor?

A prominent functionality of Spring Boot, Interceptor uses the annotated class @Component, and it implements the interface HandlerInterceptor.

The interface contains 3 main methods, which are:

The preHandle() Method − preHandle() is used for intercepting the request prior to the implementation of the handler. If preHandle() returns a “true” boolean value, developers can continue with handler execution. If preHandle() returns a “false” boolean value, developers should stop the handler execution. 

preHandle() implementation looks like:

@Override
public boolean preHandle(HttpServletRequest httpServletRequest, HttpServletResponse httpServletResponse, Object o) throws Exception {
    logger.info(" Pre handle ");
    if(httpServletRequest.getMethod().equals("GET"))
       return true;
    else
      return false;

}


The postHandle() Method − postHandle() is used for intercepting a request following the implementation of the handler. It allows the manipulation of the ModelAndView Object before users render it.

@Override
public void postHandle(HttpServletRequest httpServletRequest, HttpServletResponse httpServletResponse, Object o, ModelAndView modelAndView) throws Exception {
     logger.info(" Post handle ");
     if(modelAndView.getModelMap().containsKey("status")){
        String status = (String) modelAndView.getModelMap().get("status");
        if(status.equals("SUCCESS!")){
            status = "Authentication " + status;
            modelAndView.getModelMap().put("status",status);
            }
        }
}


The afterCompletion() Method − A HandlerInterceptor callback approach, the afterCompletion() method is used when the entire request gets completed.

afterCompletion() looks like:

@Override
public void afterCompletion(HttpServletRequest httpServletRequest, HttpServletResponse httpServletResponse, Object o, Exception e) throws Exception {
    logger.info(" After Completion ");
    }
}


Q18. What differentiates Spring Data JPA and Hibernate?

A Java Persistence API (JPA) implementation, Hibernate facilitates Object-Relational Mapping (ORM), allowing users to store, retrieve, map, and update application data to and from Java objects and relational databases. Hibernate maps the data types in Java to SQL (Structured Query Language) data types, and the classes in java to the database tables, relieving developers from scripting data persistence SQL programs. 

A Spring Data sub-project, Spring Data JPA, on the other hand, gives abstraction over the DAL (Data Access Layer) by applying JPA and Object–Relational Mapping implementations, such as Hibernate. Spring Data JPA facilitates the smooth implementation of JPA repositories, and it intends to improve the overall implementation of DAL to a great extent.

Q19. How are the @RestController and @Controller Annotations different?

The traditional Spring @Controller annotation specifies that an annotated class represents a controller. It’s basically a @Component specialization, and it is autodetected via the classpath scanning.

The @Controller annotation is used along with the annotated handler methodologies based on @RequestMapping annotations.

Developers use the @RestController annotation to develop RESTful web services, utilizing the Spring Model–View–Controller (MVC). 

The Spring @RestController maps the request data to specified request handler methods. Once the handler method generates the response body, the @RestController modifies it to XML or JSON response.

Q20. What are the basic Annotations that spring boot offers?

Core Spring Framework Annotation:-

@Required:- @Required applies to the bean setter method. This indicates that the annotated bean must be populated at the configuration time with the required property; if the following case is not satisfied, it throws an exception BeanInitializationException.

@Autowired:-

In the spring framework, spring provides annotation-based auto–wiring by providing @Autowired annotation. It is used to auto-wire spring bean on setter methods, instance variables, and constructors., When we use the annotation @Autowired, the spring container auto-wires the bean factory by matching the data type.

Other Annotations which are provided by Spring Boot, Spring Framework, and In Spring MVC are:-

@configuartion.

@Componentscan

@Bean

@component.

@Controller

@service.

@Repository

@EnableAutoConfiguaration

@SpringBootApplication.

@RequestMapping

@GetMapping

@PostMapping.


Exception Handling Interview Questions

DBMS Interview Questions Set -1

DBMS Interview Questions Set -2

SQL Interview Question Set -1

SQL Interview Question Set -2

JPA Interview Questions Set -1

JPA Interview Question Set -2

Hibernate Interview Questions

Spring Boot Interview Questions Set 1

Spring Boot Interview Questions Set 2

GIT Interview Questions

Redis Interview Questions

Core Java Interview Questions Set -1

Docker interview question Set -1

Docker interview question Set -2

Kubernetes Interview Question Set -1

Kubernetes Interview Question Set -2

Spring Boot Interview Questions Set 1

Q1. What is Spring Boot and what are its Benefits?

Spring Boot is called a microservice framework that is built on top of the spring framework. This can help developers to focus more on convention rather than configuration.

The main aim of Spring boot is to give you a production-ready application. So, the moment you create a spring-boot project, it is runnable and can be executed/deployed on the server.

It comes with features like autoconfiguration, auto dependency resolution, embedded servers, security, and health checks which enhance the productivity of a developer.

Spring Boot, utilizing the core features of the Spring application framework, offers a faster development technique for RESTful or REST architecture-based web services.

Q2. What is the difference between Spring and Spring Boot?

Difference between Spring and Spring boots are as follows:

Spring –

1. It Is a dependency injection framework.

2. It is basically used to manage the life cycle of java classes (beans). It consists of a lot of boilerplate configurations.

3. Uses XML-based configuration.

4. It takes time to have a spring application up and running and it’s mainly because of boilerplate code.

Spring boot- 

1. It is a suite of pre-configured frameworks and technologies which helps to remove the boilerplate configuration.

2. Uses annotations.

3. It is used to create a production-ready code.

Q3. What are the advantages of using Spring Boot?

The advantages of Spring Boot are listed below:

1. Easy to understand and develop spring applications.

2. Comes with Spring Boot starters to ensure dependency management and also provides various security metrics

1. Provides auto-configuration to load a set of default configurations for a quick start of the application

2. Spring Boot is nothing but an existing framework with the addition of an embedded HTTP server and annotation configuration which makes it easier to understand and faster the process of development.

3. Increases productivity and reduces development time.

4. Minimum configuration.

5. We don’t need to write any XML configuration, only a few annotations are required to do the configuration.

6. Create stand-alone Spring applications that can be started using java -jar.

7. Embed Tomcat, Jetty, or Undertow directly. You don't need to deploy WAR files.

8. It provides opinionated 'starter' POMs to simplify your Maven configuration.

9. It automatically configures Spring whenever possible.

10. Spring Boot provides an opinionated view to reduce the developer effort and simplify maven configurations

11. Provides CLI tool to develop and test applications

Q4. What are the features and components of Spring Boot?

1. Spring CLI 

2. Starter Dependency

3. Auto-Configuration

4. Spring Initializer

5. Spring Actuator

6 Logging and Security

2. Version Management.

4. Component Scanning.

5. Embedded server.

6. InMemory DB.

7. Actuators

8. Web Development

9. SpringApplication

10. Application events and listeners

11. Admin features

Q5. What makes Spring Boot superior to JAX-RS?

By leveraging Spring Boot features, users can experience significant advantages over JAX-RS, including:

1. Fast deployment

2. High scalability

3. Container compatibility

4. Minimal configuration

5. Lower production time

6. Increased productivity

7. Reduced development time

8. Easy monitoring and management of applications

Q6. What Spring Boot features help develop Microservices Applications

Primarily used for developing microservices-based applications, Spring Boot offers the following key features for configuring, developing, and deploying microservices architecture.

1. Integrates a tool called the Actuator, which enables users to manage and monitor applications.

2. Provides support for embedded servers, such as Jetty and Tomcat.

3. Users can simply run war files, without deploying it.

4. Includes an Auto-Configuration functionality, allowing users to configure Spring applications automatically.

5. Supports HTTP client Feign.

Q7. Why Spring Boot is preferred over any other framework?

The Spring cloud that comes with Spring Boot, includes vast libraries, which is one of the major reasons why most developers prefer Java-based Spring Boot. In addition, Spring Boot offers superior compatibility with Spring frameworks, and it also provides excellent support for docker containerization, heightening performance, and useability.

Some of the most compelling reasons for using Spring Boot include: 

1. Provides the best means to configure Java beans.

2. Offers robust batch processing.

3. Helps users effectively manage Representational State Transfer (REST) endpoints.

4. Integrates an auto-configuration tool, eliminating the need for manual configuration.

5. Enables annotation-based configurations.

6. Ease of dependency management.

7. Includes embedded servlet containers

Q8. What are the key dependencies of Spring Boot?

Mentioned below are important Spring Boot dependencies that need to be added to a Gradle-based or Maven-based application, to ensure application compatibility with Spring Boot features.

1. spring-boot-starter-parent

2. spring-boot-maven-plugin

3. spring-boot-starter-test

4. spring-boot-starter-security

5. spring-boot-starter-actuator

6. Spring-boot-starter-web

Q9. How does Spring Boot work?

Spring Boot automatically configures your application based on the dependencies you have added to the project by using annotation. The entry point of the spring boot application is the class that contains the @SpringBootApplication annotation and the main method. Spring Boot automatically scans all the components included in the project by using the @ComponentScan annotation.

Q10. How to create a war file in spring boot?

To create a war file in spring boot you need to define your packaging file as the war in your pom.xml(if it is a maven project). Then just do maven clean and install so that your application will start building. Once the build is successful, just go into your Target folder and you can see the .war file generated for your application.

Q11. How does the @SpringBootApplication annotation internally work?

The @SpringBootApplication annotation is equivalent to using @Configuration, @EnableAutoConfiguration, and @ComponentScan with their default attributes. Spring Boot enables the developer to use a single annotation instead of using multiple. But, as we know, Spring provided loosely coupled features that we can use for each annotation as per our project needs.

Q12. What is the purpose of using @ComponentScan in the class files?

Spring Boot application scans all the beans and package declarations when the application initializes. You need to add the @ComponentScan annotation for your class file to scan the components added to your project.

Q13. How does a spring boot application get started?

Spring Boot application must have a main method. This method serves as an entry point, which invokes the SpringApplication#run method to bootstrap the application.

Example

@SpringBootApplication
public class MyApplication {

    public static void main(String[] args) {
        SpringApplication.run(MyApplication.class);

    }

}


Q14 What is the Spring Boot available for starters?

Spring Boot starters are a set of convenient dependency management providers that can be used in the application to enable dependencies. These starters, make development easy and rapid. All the available starters come under the org.springframework.boot group. 

Few of the popular starters are as follows:

1. spring-boot-starter: – This is the core starter and includes logging, auto-configuration support, and YAML.

2. spring-boot-starter-jdbc – This starter is used for the HikariCP connection pool with JDBC

3. spring-boot-starter-web – Is the starter for building web applications, including RESTful, applications using Spring MVC

4. spring-boot-starter-data-jpa – Is the starter to use Spring Data JPA with Hibernate

5. spring-boot-starter-security – Is the starter used for Spring Security

6. spring-boot-starter-aop: This starter is used for aspect-oriented programming with AspectJ and  Spring AOP.

7. spring-boot-starter-test: This is the starter for testing Spring Boot applications.

Q15. What are starter dependencies?

Spring boot starter is a maven template that contains a collection of all the relevant transitive dependencies that are needed to start a particular functionality. Like we need to import spring-boot-starter-web dependency for creating a web application.

<dependency>
    <groupId> org.springframework.boot</groupId>
    <artifactId> spring-boot-starter-web </artifactId>
</dependency>


Q16. What is Spring Initializer?

Spring Initializer is a web application that helps you to create an initial spring boot project structure and provides a maven or Gradle file to build your code. It solves the problem of setting up a framework when you are starting a project from scratch.

Q17. What is Spring Boot CLI and what are its benefits?

Spring Boot CLI is a command-line interface that allows you to create a spring-based java application using Groovy.

Example: You don’t need to create a getter and setter method or access modifier, return statement. If you use the JDBC template, it automatically loads for you.

Q18. What are the most common Spring Boot CLI commands?

spring -run, spting -test, spring -grap, spring -jar, spring -war, spring -install, spring -uninstall, spring --init, spring -shell, spring -help.

Q19. What Are the Main Annotations that Spring Boot Offers?

The primary annotations that Spring Boot offers reside in its org.springframework.boot.autoconfigure and its sub-packages.

Here are a couple of basic ones:

@EnableAutoConfiguration – to make Spring Boot look for auto-configuration beans on its classpath and automatically apply them.

@SpringBootApplication – used to denote the main class of a Boot Application. This annotation combines @Configuration, @EnableAutoConfiguration, and @ComponentScan annotations with their default attributes.

Q20. What is Spring Boot dependency management?

Spring Boot dependency management is used to manage dependencies and configuration automatically without you specifying the version for any of that dependencies.


Exception Handling Interview Questions

DBMS Interview Questions Set -1

DBMS Interview Questions Set -2

SQL Interview Question Set -1

SQL Interview Question Set -2

JPA Interview Questions Set -1

JPA Interview Question Set -2

Hibernate Interview Questions

Spring Boot Interview Questions Set 1

Spring Boot Interview Questions Set 2

GIT Interview Questions

Redis Interview Questions

Core Java Interview Questions Set -1

Docker interview question Set -1

Docker interview question Set -2

Kubernetes Interview Question Set -1

Kubernetes Interview Question Set -2

How to create Reactive REST API with in-memory database in Spring Boot

Spring Boot Reactive Restful API with In-memory database reactive streaming Examples

Purpose: In this guide, I want to show how easy it is to create a reactive REST API with Spring Boot and save data into an in-memory database. I would like to take a simple Use Case to show how quick it is possible to create an “active” non-blocking REST API with Spring Boot.

Case Study:In this case study we will register the employee at the company front gate and will show the registered employee in the company interview room without refreshing the page and will save it into the database.

1. Setup and Create Project: Visit hereSpring Boot Rest API Hello World Examples.

Next Step. Spring Boot Parent Dependencies.


<parent>
        <groupId>org.springframework.boot</groupId>
        <artifactId>spring-boot-starter-parent</artifactId>
        <version>2.6.7</version>
        <relativePath /> <!-- lookup parent from repository -->
    </parent>
Next Step. WebFlux dependency.

<dependency>
    <groupId>org.springframework.boot</groupId>
    <artifactId>spring-boot-starter-webflux</artifactId>
</dependency>

Next Step. In-memory database dependency.

<dependency>
    <groupId>com.h2database</groupId>
    <artifactId>h2</artifactId>
</dependency>

Next Step. Spring Boot main class.

Class: Application.java

Note: @SpringBootApplication=@Configuration+ @EnableAutoConfiguration+ @ComponentScan.


package com.bce;

import org.springframework.boot.SpringApplication;
import org.springframework.boot.autoconfigure.SpringBootApplication;
import org.springframework.context.annotation.Bean;
import com.bce.model.Employee;
import reactor.core.publisher.Sinks;

@SpringBootApplication
public class Application {

    public static void main(String[] args) {
        SpringApplication.run(Application.class, args);
    }
    // Reactive sink bean create here and it will return the latest object
    @Bean("empoyeePublisher")
    public Sinks.Many<Employee> sink(){
        return Sinks.many().replay().latest();
    }
}


Next Step. Create Rest Controller.


package com.bce.controller;

import java.util.concurrent.atomic.AtomicLong;

import org.springframework.beans.factory.annotation.Autowired;
import org.springframework.http.MediaType;
import org.springframework.http.codec.ServerSentEvent;
import org.springframework.web.bind.annotation.GetMapping;
import org.springframework.web.bind.annotation.PostMapping;
import org.springframework.web.bind.annotation.RequestBody;
import org.springframework.web.bind.annotation.RestController;

import com.bce.model.Employee;
import com.bce.service.EmployeeService;

import reactor.core.publisher.Flux;
import reactor.core.publisher.Sinks;

@RestController
public class EmployeeController {

    @Autowired
    EmployeeService employeeService;

    @Autowired
    private Sinks.Many<Employee> employeeStream;
    final AtomicLong counter = new AtomicLong();

    @PostMapping("/employee")
    public void saveEmployee(@RequestBody Employee employee) {
        employeeService.processRecords(employee);
    }

    @GetMapping(value = "/employeeStream", produces = MediaType.TEXT_EVENT_STREAM_VALUE)
    public Flux<ServerSentEvent<Employee>> employeeStream() {
        return employeeStream.asFlux().map(e -> ServerSentEvent.builder(e).build());
    }

}

The default server port is 8080. Wish you want to change open 

server.port=8080

Next Step. Run the application and open the below URI  to view the employee 

http://localhost:8080/api/employeeStream.

To create an employee  use this endpoint http://localhost:8080/api/employee

In the below screen we are creating employees and streaming them on a real-time basis.


Next Step. Also, check the employee into the in-memory database. To set up the h2 console visit here "Past link here"


Download Code from GitHub.  Download

How to enable H2 console with Reactive REST API in Spring Boot

Spring Boot H2 console enables reactive streaming Examples

Purpose: In this guide, I want to show how to enable the in-memory h2 console in Spring Boot with reactive mono.

1. Create reactive API Visit hereHow to create Reactive REST API in Spring Boot.

Next Step. Add in-memory database dependency.

<dependency>
    <groupId>com.h2database</groupId>
    <artifactId>h2</artifactId>
    <scope>runtime</scope>
</dependency>

Next Step: The default server port is 8080. Wish to change port 
 
server.port=8080


# Basic property
spring.application.name = reactive-basic
server.port=8080
spring.webflux.base-path=/api

# H2-database property
spring.datasource.driverClassName=org.h2.Driver
spring.datasource.username=sa
spring.datasource.password=
spring.jpa.database-platform=org.hibernate.dialect.H2Dialect
#enabling the H2 console
spring.h2.console.enabled=true
spring.jpa.show-sql=true
spring.jpa.generate-ddl=true
spring.jpa.hibernate.ddl-auto=update
spring.datasource.url=jdbc:h2:C:/data/reactive
 
# Custom H2 Console URL
spring.h2.console.path=/h2
management.endpoints.web.exposure.include=*


Next Step. Run the application and you will see the application is running successfully but the H2 console not working.


Next Step: To resolve the above issue add H2Config.


To remove the code error please remove scope (runtime) from the h2 dependency:

<dependency>
    <groupId>com.h2database</groupId>
    <artifactId>h2</artifactId>
    <scope>runtime</scope>
</dependency>


package com.bce;

import org.springframework.context.event.EventListener;
import org.springframework.stereotype.Component;

@Component
public class H2 {
    private org.h2.tools.Server webServer;
    private org.h2.tools.Server tcpServer;
    @EventListener(org.springframework.context.event.ContextRefreshedEvent.class)
    public void start() throws java.sql.SQLException {
        this.webServer = org.h2.tools.Server.createWebServer("-webPort", "8082", "-tcpAllowOthers").start();
        this.tcpServer = org.h2.tools.Server.createTcpServer("-tcpPort", "9092", "-tcpAllowOthers").start();
    }

    @EventListener(org.springframework.context.event.ContextClosedEvent.class)
    public void stop() {
        this.tcpServer.stop();
        this.webServer.stop();
    }
}


Next Step: Run again and hit URI (http://localhost:8082)


Download Code from GitHub.  Download